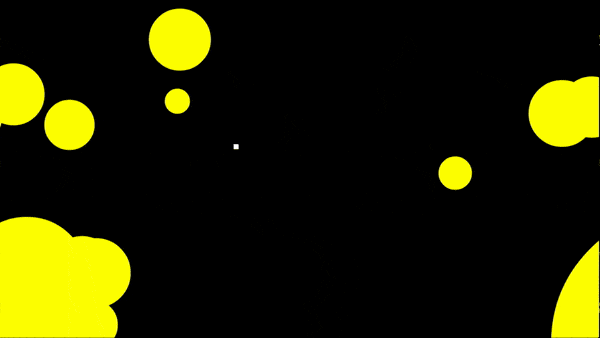
I watched this video (a talk by Jan Willem Nijman from Vlambeer; 30 tiny tricks that will make your action game better) and got really excited about screen shake (too excited probably) so I made this demo about smashing through yellow circles (asteroids?) as a little square ship dude. W,A,S,D to move your ship around and blast through the asteroids (sorry mobile users, keyboard only).
I’m sure a game is in there somewhere…I just have to fish it out (which I’ll most likely do at some point).
Notice how it FEELS AWESOME to smash through everything. That’s the power of screen shake.
On my endeavor to figure out how to shake the screen, I first had to learn a better way of handling the camera and figure out the real relationship between camera space and world space. Once I understood that transformation, I only had to grasp how a camera’s position changed over time to fully understand camera shake.
Here follows my quest to understand camera space and, ultimately, screen shake. GO!
World space vs Camera space
The camera is the window into the world of the game; it defines what the player can and cannot see. By this idea there exists two spaces within the game: world space and camera space.
World space is the world in which all of the objects in a game reside; the player’s character, environment, enemies, and any other entities. It is the global coordinate space. Anything that will ever exist in the game will have a starting position based on this coordinate system.
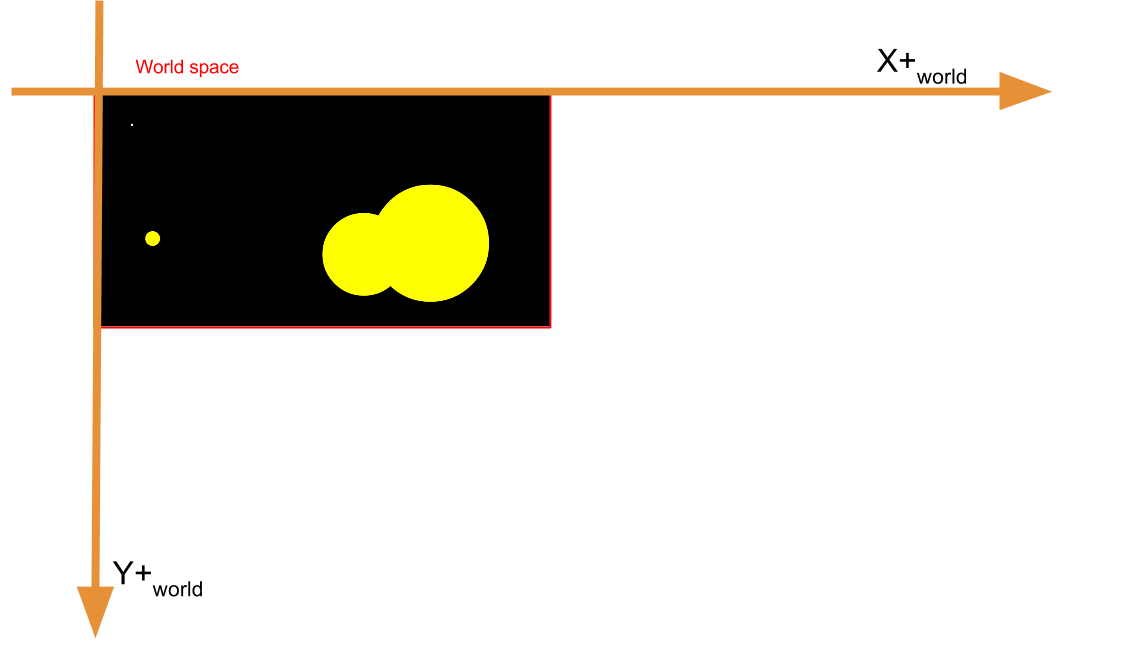
Figure 1—The world space with player and entities. Notice that the world space origin is the top left corner of the space.
Camera space is the bounding area that is viewable at any point in time. Only objects that are within the bounds of the camera space will be visible to the player and drawn on the screen.
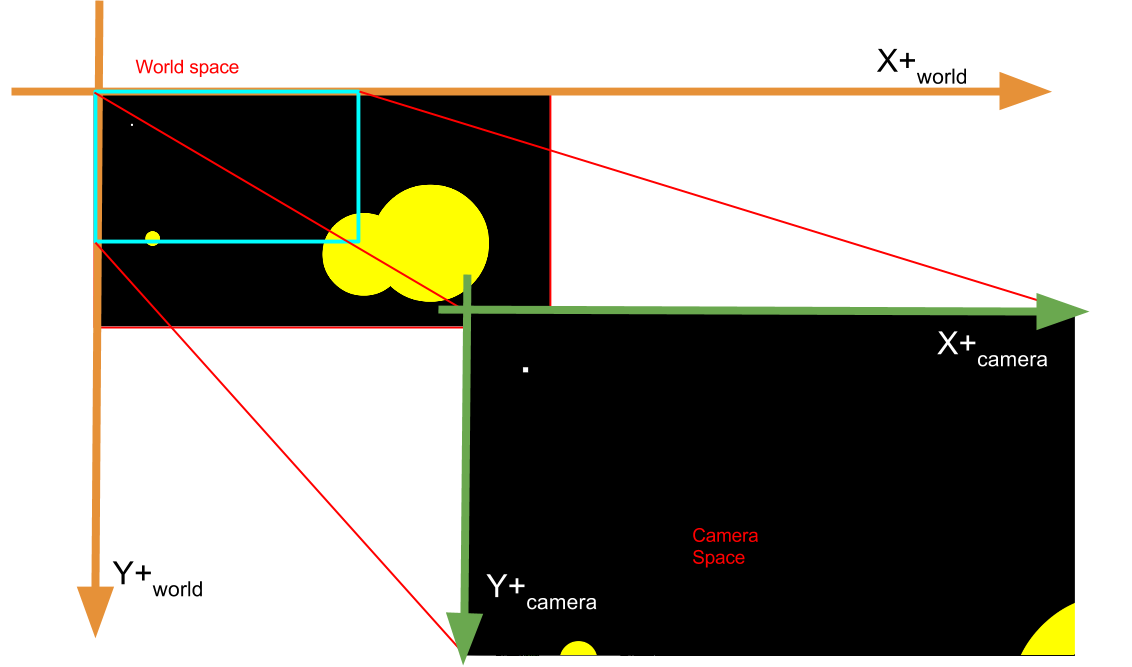
Figure 2—Camera space has it’s own coordinate axes (also starting at the top left of the space). Only entities within the bounds of the camera are seen by the player. The camera space is the same as the canvas.
Since this is an article about Javascript and using the <canvas>, the camera is equivalent to the canvas. When drawing, the canvas context assumes camera space. No matter where the camera object is positioned, if the canvas context is called to draw something at (0,0) the object will be at the top left of the screen (because that’s where the origin is for computer graphics).
On each rendering pass, the game must correct entity positions to be relative to the camera’s current position otherwise your entities won’t be drawn correctly.
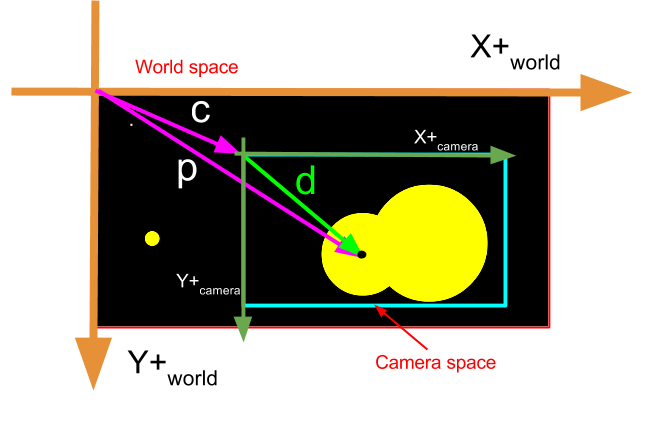
Figure 3—from world origin at top-left corner, subtract the camera’s position vector from the entity’s position vector to find the entity’s position vector relative to the camera’s position . Use to draw this entity.
Subtracting the camera’s position from the entity’s position gives the entity’s current position relative to the camera (and relative to the canvas origin). Once you perform that transformation, when the game draws this entity it will use the corrected position to draw the entity in the correct location.
Congratulations! You just performed a coordinate transformation, specifically a coordinate origin translation. This is arguable the most important aspect to grasp between Camera space and World space—transforming coordinates between the two spaces.
Now that those two spaces are clearly defined I can think about some other properties of a camera.
Properties of a camera
Not only does a camera have length and width to define its view frustrum, but also a position in world space (as seen above when transforming between the two spaces). Because positions change, it also has velocity and acceleration to help determine how that position changes from frame to frame.
Hmm…sounds like every other entity…
That’s true! A camera is an entity just like anything else—albeit a special entity that has rendering powers—but a normal entity nonetheless. This means that a camera’s position gets updated every frame according to any forces (or accelerations) acting on the camera.
The only other important factor defining a camera is its ability to follow something or someone; like the player.
While I could update the position of the camera directly every frame, it would be better (and more physics-y) if I could just tell the camera where it should be, and have it interpolate that distance over many frames. This will allow the camera to smoothly scroll and not jerk or snap to the target location.
Better yet, instead of assigning the camera’s current position to the next interpolated value, I’m going to apply an acceleration to the camera in the direction of the target position.
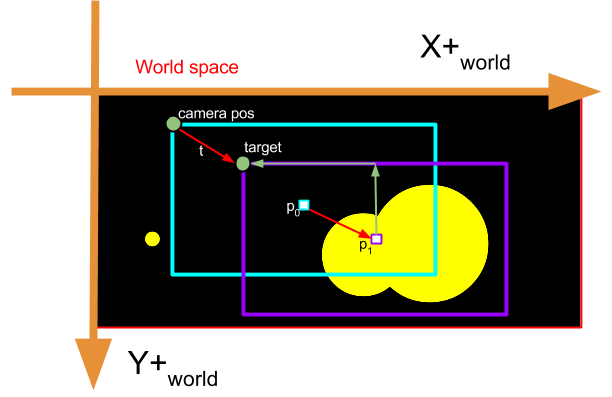
Figure 4—as the player moves from position to , a new target location gets projected. Update the camera’s position by applying an acceleration to the camera along , the vector between the camera’s current position and the target position
Every frame I calculate a new target position—where the camera should eventually be—based off of the player’s current position:
// calculate where the camera should eventually be
camera.target.x = player.pos.x - (camera.width / 2);
camera.target.y = player.pos.y - (camera.height / 2);
And then apply a force to the camera in the direction of the target position:
// give the camera a nudge in the target's direction
camera.accel.x += (camera.target.x - camera.pos.x) * (drag);
camera.accel.y += (camera.target.y - camera.pos.y) * (drag);
Now when the camera position gets updated, it will move in the direction of the target position thanks to the acceleration I just calculated.
camera.target - camera.pos defines a vector pointing in the direction of the target. If you wanted more control over the magnitutde of the acceleration, normalize the vector between the target and camera position, multiply by any scalar you wish, and add that vector to the camera’s acceleration.
It just so happened that using a velocity-like force—(camera.target - camera.pos)—controlled by drag worked really well for me, but might not work for all.
If you don’t know what I mean by velocity-like force, check out Verlet Integration—when integrating an entity’s position, velocity is used implicitly from the entity’s current position and previous position, just like camera.target - camera.pos.
Now that everything is in place, I can finally get to…
For the sake of screen shake!
YES! The whole reason I started was to code up some juicy screen shake and now the time is finally here.
Turns out, I already covered all of the hard stuff! Implementing screen shake is super simple. There are two requirements:
- how intense should the shaking be
- how much to dampen the shaking each frame
All two of these requirements will be assembled into an acceleration force that will be applied to the camera. These accelerations need to be sharp—controlled by the strength of the shake—in order to move the camera a significant amount to simulate a “jerk” in a random direction.
No need to remember the original position of the camera or anything of the like—all of that is taken care of. Since the shake is just an acceleration force, the target position for the camera does not change. The camera will naturally flow back to its intended position once the shaking is finished.
To calculate the accelerations to use for shaking, I use the two requirements above to make a random acceleration on the range of [-strength, strength) and add that to the camera’s current acceleration. After that, I dampen the strength to make the shaking die down. If there is no more strength left, the camera won’t shake anymore:
 1 // as long as there is strength left to shake...
 2 if (camera.strength > 0) {
 3
 4   // get random acceleration on the interval [-strength, strength)
 5   var randx = Math.random() * 2 * camera.strength - camera.strength;
 6   var randy = Math.random() * 2 * camera.strength - camera.strength;
 7
 8   // add in the shaking acceleration
 9   camera.accel.x += randx;
10   camera.accel.y += randy;
11
12   // reduce strength
13   camera.strength -= camera.damper;
14 }
The random acceleration will make the camera shake the most violent at the start, then die down due to the damper, and eventually the camera will return to the target position.
To kick off the shaking, just set the strength and damper and let the camera update itself:
1 // start shaking!
2 camera.strength = 90;
3 camera.damper = 5;
Now the camera will shake until there is no strength left. Put this little snippet of code anywhere to trigger the shaking—on a button press, on a player collision with an asteroid, on a bullet collision with an enemy, on an explosion, etc.
YAY! Screen shake has now been implemented. My quest has ended.
Cool! How can I use this?
There was a lot here to just handle shaking the screen but I think all of it was worth mentioning because it opens doors to other effects you can implemenet using a physics based simulation; you don’t have to just shake the screen, you can shake any object that acts on accelerations.
However, I realize that this might be hard to implement into every system, so I’ll list some main points this post covers:
- Camera space is different than World space
- a canvas drawing context always assumes camera space
- The camera is just an object
- it has position, velocity, and acceleration like everything else in your game
- To follow an object is to define a target point for your camera
- slowly move the camera to the target position over many frames via acceleration forces
- Camera Shake
- add random acceleration forces on a strength interval which die down over many frames
Getting the camera to do what you want is really tricky. It requires a lot of trial and error to get the right “feel”, but having a camera is really important and having a camera that works and feels correct is even more important.
One last noteworthy topic is that while you can try to do most of these physics things yourself, consider getting a physics library—even a small one. I use pocket-physics. It’s lightweight, on npm, and handles calculating verlet integrations, drag, distance constraints, spring constratints, gravitation, allows work on vectors directly, etc; all of the cool physics-y things you’d ever want.
Well hopefully that made sense.
The End.
Wait! What kind of post would this be without a demo?!
He’s a codepen. It doesn’t have crazy smashing like the demo does, but it illustrates the point of camera following a player with screen shaking. You might have to rerun the results pane, and give the canvas focus by clicking on it once it’s reloaded. Otherwise go nuts!
Also, so you don’t have to scroll to the top of the page, check out the super awesome asteroids collision bonanaza. Same controls as the codepen (sorry mobile users, keyboard only).
(W,A,S,D to move, Shift to shake, ESC to stop animations):
// camera object
var camera = {
  cpos : { x : 0, y : 0 },
  ppos : { x : 0, y : 0 },
  acel : { x : 0, y : 0 },
  height : document.body.clientHeight,
  width  : document.body.clientWidth,
  maxHeight : 6 * document.body.clientHeight,
  maxWidth  : 6 * document.body.clientWidth,
  cullDist : 300,
  bound : true,
  target : { x : 0, y : 0 }
}

// player object
var player = {
  cpos : { x : 0, y : 0 },
  ppos : { x : 0, y : 0 },
  acel : { x : 0, y : 0 }
}

// handle input
var inputs = {};
document.addEventListener("keydown", function(ev) {
  inputs[ev.keyCode] = true;
}, false);
document.addEventListener("keyup", function(ev) {
  inputs[ev.keyCode] = false;
}, false);

// init entities
var entities = [];
for (var i = 0; i < 100; i++) {
  var randx = Math.random() * 6 * document.body.clientWidth;
  var randy = Math.random() * 6 * document.body.clientHeight;
  entities.push({
    cpos : { x : randx, y : randy },
    ppos : { x : randx, y : randy },
    acel : { x: 0, y : 0 }
  });
}

console.log(entities);
// canvas stuff
var cvs = document.getElementById("canvas");
cvs.width = document.body.clientWidth;
cvs.height = document.body.clientHeight;
var ctx = cvs.getContext('2d');

function clearBlack() {
  ctx.beginPath();
  ctx.fillStyle = "black";
  ctx.fillRect(0, 0, cvs.width, cvs.height);
}
var anim;
function update() {
  anim = requestAnimationFrame(update);
  // clear screen
  clearBlack();

  // check inputs
  // up - w
  if (inputs[87]) {
    player.acel.y = -6;
  }

  // down - s
  else if (inputs[83]) {
    player.acel.y = 6;
  }

  // left - a
  if (inputs[65]) {
    player.acel.x = -6;
  }

  // right - d
  else if (inputs[68]) {
    player.acel.x = 6;
  }

  // get the target point
  camera.target.x = player.cpos.x - (camera.width / 2);
  camera.target.y = player.cpos.y - (camera.height / 2);

  // move camera towards target point
  camera.acel.x += (1 / 8) * (camera.target.x - camera.cpos.x);
  camera.acel.y += (1 / 8) * (camera.target.y - camera.cpos.y);

  // verlet integration on player and camera
  player.ppos.x = player.cpos.x + (player.ppos.x - player.cpos.x) * 0.81;
  player.ppos.y = player.cpos.y + (player.ppos.y - player.cpos.y) * 0.81;
  player.cpos.x += player.acel.x * 0.256;
  player.cpos.y += player.acel.y * 0.256;
  var px = 2 * player.cpos.x - player.ppos.x;
  var py = 2 * player.cpos.y - player.ppos.y;
  player.ppos.x = player.cpos.x;
  player.ppos.y = player.cpos.y;
  player.cpos.x = px;
  player.cpos.y = py;
  player.acel.x = 0;
  player.acel.y = 0;

  camera.ppos.x = camera.cpos.x + (camera.cpos.x - camera.ppos.x) * 0.96;
  camera.ppos.y = camera.cpos.y + (camera.cpos.y - camera.ppos.y) * 0.96;
  camera.cpos.x += camera.acel.x * 0.256;
  camera.cpos.y += camera.acel.y * 0.256;
  var cx = 2 * camera.cpos.x - camera.ppos.x;
  var cy = 2 * camera.cpos.y - camera.ppos.y;
  camera.ppos.x = camera.cpos.x;
  camera.ppos.y = camera.cpos.y;
  camera.cpos.x = cx;
  camera.cpos.y = cy;
  camera.acel.x = 0;
  camera.acel.y = 0;

  if (camera.bound) {

    // flush camera -- x bounds
    camera.cpos.x = Math.min(camera.cpos.x, camera.maxWidth - camera.width);
    camera.cpos.x = Math.max(camera.cpos.x, 0);

    // flush camera -- y bounds
    camera.cpos.y = Math.min(camera.cpos.y, camera.maxHeight - camera.height);
    camera.cpos.y = Math.max(camera.cpos.y, 0);
  }

  // draw stuff
  var playerx = player.cpos.x - camera.cpos.x;
  var playery = player.cpos.y - camera.cpos.y;
  ctx.beginPath();
  ctx.fillStyle = "white";
  ctx.fillRect(playerx, playery, 10, 10);

  for (var i = 0; i < entities.length; i++) {
    var entity = entities[i];
    var ex = entity.cpos.x - camera.cpos.x;
    var ey = entity.cpos.y - camera.cpos.y;
    ctx.beginPath();
    ctx.fillStyle="gold";
    ctx.arc(ex,ey, 10, 0, 2*Math.PI, false);
    ctx.fill();
  }
}


anim = requestAnimationFrame(update);
document.addEventListener("keydown", function(ev) {
  if (ev.keyCode === 27) {
    cancelAnimationFrame(anim);
  }
});
See the Pen 2d physics camera with screen shake! by Alex Petersen (@theoperatore) on CodePen.
Now it’s the end for real, thanks for reading!